linux下svn服务器搭建及使用
文章目录
1. 安装svn客户端
2. 安装svn服务器
3. 在svn目录下创建版本库
4. 修改版本库配置文件
4.1 修改 authz 文件
4.2 设置密码 passwd
4.3 修改 svnserve.conf 文件(重要)
5. 启动svn服务器
6. 客户端访问svn服务器
7. SVN CheckOut
1. 安装svn客户端
若需要使用svn服务,首先本地需要安装svn客户端。
svn客户端下载地址为:http://tortoisesvn.net/downloads.html
安装过程此处略过。
2. 安装svn服务器
安装svn服务器:
yum install subversion
1
查看下载后的信息,安装位置及详细信息:
rpm -ql subversion
1
3. 在svn目录下创建版本库
可以在版本库目录下放置多个项目,不必为每个项目创建一个版本库。下面是我的版本库:
# 创建版本库目录
mkdir /home/svn/groupRepos
# 创建版本库
svnadmin /home/svn/groupRepos
1
2
3
4
查看并分析生成的文件:
ls /home/svn/groupRepos
1
可以看到如下文件:
conf目录:版本库的配置文件,包含用户访问账号、权限等
db目录:存放数据
format文件:是一个文本文件,里面只放了一个整数,表示当前文件库配置的版本号(可以用vi打开看一下)
hooks目录:放置hook脚本文件的目录
locks目录:用来放置subversion的db锁文件和db_logs锁文件的目录,用来追踪存取文件库的客户端
README.txt文件:说明文档
注:这里生成文件可能有一定的滞后,如果未看到文件可以稍微等一会再查看。
4. 修改版本库配置文件
版本库的配置文件位于 /home/svn/groupRepos/conf/ 路径下,包含有以下几个文件:
authz:负责账号权限的管理,控制账号是否读写权限
passwd:负责账号和密码的用户名单管理
svnserve.conf:svn服务器配置文件
4.1 修改 authz 文件
vim /home/svn/groupRepos/conf/authz
1
添加账号及权限后的 authz 文件如下:
### This file is an example authorization file for svnserve.
### Its format is identical to that of mod_authz_svn authorization
### files.
### As shown below each section defines authorizations for the path and
### (optional) repository specified by the section name.
### The authorizations follow. An authorization line can refer to:
### - a single user,
### - a group of users defined in a special [groups] section,
### - an alias defined in a special [aliases] section,
### - all authenticated users, using the '$authenticated' token,
### - only anonymous users, using the '$anonymous' token,
### - anyone, using the '*' wildcard.
###
### A match can be inverted by prefixing the rule with '~'. Rules can
### grant read ('r') access, read-write ('rw') access, or no access
### ('').
[aliases]
# joe = /C=XZ/ST=Dessert/L=Snake City/O=Snake Oil, Ltd./OU=Research Institute/CN=Joe Average
[groups]
# harry_and_sally = harry,sally
# harry_sally_and_joe = harry,sally,&joe
# [/foo/bar]
# harry = rw
# &joe = r
# * =
# [repository:/baz/fuz]
# @harry_and_sally = rw
# * = r
[/]
Jack = rw
1
2
3
4
5
6
7
8
9
10
11
12
13
14
15
16
17
18
19
20
21
22
23
24
25
26
27
28
29
30
31
32
33
34
只需在末尾添加,无需在文件其他部分修改和添加任何东西末尾内容如下:
[\]
然后设置 账号 = 权限
r:读
w:写
:wq 保存退出即可
1
2
3
4
5
4.2 设置密码 passwd
### This file is an example password file for svnserve.
### Its format is similar to that of svnserve.conf. As shown in the
### example below it contains one section labelled [users].
### The name and password for each user follow, one account per line.
[users]
# harry = harryssecret
# sally = sallyssecret
Jack = 123456
1
2
3
4
5
6
7
8
9
4.3 修改 svnserve.conf 文件(重要)
vi /home/svn/groupRepos/conf/svnserve.conf
1
修改后的文件如下:
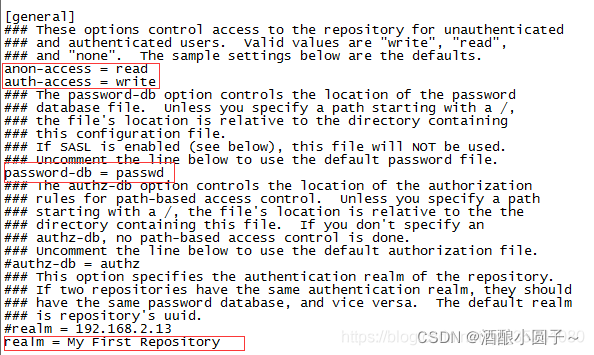
注:
大多数网络资料,都会让大家将authz-db = authz这条给去掉注释,经过我本人多次被坑经验,此条去掉后,虽然svn服务器可以连接,但一直会提示“认证失败”,注释掉即可正常。
还有多数资料会让大家在realm = My First Repository处填写服务器ip,经过测试,填写后并无什么用处,所以大家去掉注释即可,无需做任何修改到此,配置已经全部完成,账号信息已经添加成功
【注意】:开启防火墙的状态下需要开放 svn 端口:3690,Linux下添加对外端口可参考博客:Linux下防火墙开启外网端口
5. 启动svn服务器
启动svn服务器:
svnserve -d -r /home/svn/groupRepos
1
启动成功后,可用ps -aux查看服务启动是否成功,这个是显示所有的运行进程:
ps -ef |grep svn
# xxx 22052 1 0 15:59 ? 00:00:00 svnserve -d -r /home/svn/groupRepos
# xxx 28962 20465 0 16:19 pts/1 00:00:00 grep --color=auto svn
1
2
3
pid=22052 就是svn服务器对应的进程id,若要关闭该进程可使用 kill -9 pid 命令。
6. 客户端访问svn服务器
在svn客户端,输入地址:svn://ip地址:3690/groupRepos
(iP地址为你的svn服务器ip,groupRepos为前文创建的版本库名称,3690为svn默认端口)
svn://xxx.xxx.xxx.xxx:3690/groupRepos
1
弹出输入用户名和密码,输入即可访问。
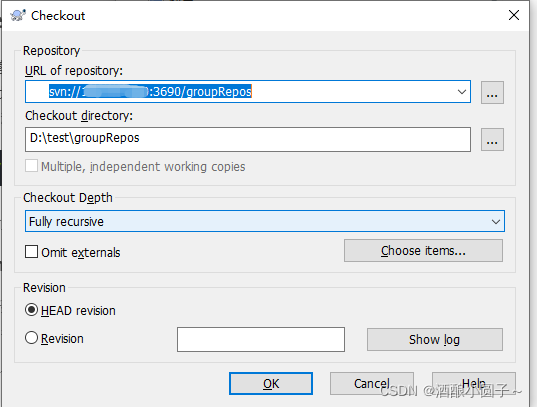
7. SVN CheckOut
本地新建一个目录,鼠标右键点击 SVN CheckOut选项,输入用户名及密码,即可CherkOut版本库中已有的资源。
CherkOut 后可看到本地文件中新增一个 .svn 的文件。
本地新增文件上传,选择 SVN Commit。
拉取版本库中最新的文件,选择 SVN Update。
【参考博客】:
linux下svn服务器搭建及使用(包含图解): https://blog.csdn.net/u011280484/article/details/50499534
Linux下的SVN服务器搭建: https://blog.csdn.net/qq_35241080/article/details/87875142
————————————————
版权声明:本文为CSDN博主「酒酿小圆子~」的原创文章,遵循CC 4.0 BY-SA版权协议,转载请附上原文出处链接及本声明。
原文链接:https://blog.csdn.net/u012856866/article/details/122489995
 ∷
∷


 湖南智能-MSN
 湖南智能-Skype
 湖南智能-阿里